Introduction
Over the last six months, I’ve been working on a microservices-oriented application, and it has reached a level of complexity that means I could not do without the tests I have written. My tests are not perfect, and there’s times when I’ve plumped for slow functional tests when fast unit tests would have been better, but nevertheless, they have saved my bacon more times than I recall. These tests are run in the early stage of a CI build. If the tests pass, the build will create a Docker image, and push it to a private registry, which means that any image in the registry is OK to use (with the proviso that tests are fallible, of course!).
I have applied the same principles to building my general-purpose web server that hosts this blog. I’ve recently documented some of the architecture, and I thought I’d also take the time to examine the build process.
So, to set up a Dockerised server, I needed to integrate these pieces of the jigsaw puzzle:
- A Linux-based server (I use a 1G machine from Vultr, but any VPS provider is OK here)
- A DNS provider (I like to use a separate company from my server provider, I use Mythic Beasts)
- Free TLS certs from Lets Encrypt (plus one paid cert, which will be replaced in due course)
- Private Git repositories for each container (I use the free tier of BitBucket)
- A continuous integration (CI) provider (I use the free tier of CircleCI)
- A Docker image registry (I use the free tier of GitLab)
I use CircleCI because I think it’s easy to use, and the free offering is excellent: 25 hours of build time per month. In fact, it turns out that GitLab offer build servers as well, and their free tier offers 33 hours. However, since I started with CircleCI, and I’m happy with it, I have no reason to move.
What’s great about F/OSS and the wider standards-based development ecosystem is that pieces work very well together. Thus, I can use Circle build servers and push images to GitLab, and if I want to move my CI to GitLab and my registry to AWS ECR, I can do that pretty quickly. Although I pay for my hosting and DNS, what’s nice is that free suitable offerings for Git hosting, CI and image registry hosting are available.
Workflow
The workflow I presently use looks a bit like this:
- Make a Dockerfile change locally
- Rebuild the Docker image
- Restart the associated service and test it manually
- If I’m happy, I commit the change and push it to BitBucket
- This is auto-detected by CircleCI, which kicks off a new build
- If this is successful, then a new Docker image will be pushed to GitLab
- Check that the build status was green (i.e. the Docker build was successful)
- SSH into the server, pull the new image, retag it, and restart the container
That’s simple enough that a WordPress upgrade, for example, can be done quickly and easily. This is good for security, since it means I am less likely to defer the job to another time.
Preparing a base server
I have some build notes in a repository to help prepare the server for the first time. This is so much shorter than all the work required to get WordPress to play nicely!
- Create a 1G server at VPS provider (e.g. Vultr, Linode, Digital Ocean, AWS Lightsail, etc)
- Generate a new SSH key locally
- For cloud providers that offer it, do these tasks in the admin console:
- Set up an inbound firewall allowing 22, 80 and 443 only
- Add an SSH key
- Install software:
apt-get install -y docker.ioapt-get install -y mysql-server
- Set MySQL root password
- Reset MySQL config so it listens on all interfaces (required for containers to connect to it)
- Create a new GitLab token
- Add a Docker login remotely using the token (
docker login -u username registry.gitlab.com) - Create a new Docker network (
docker network create mynet) for containers to join if required - From the local dev machine, run these locally (in practice I have scripts for these):
- Copy old TLS certificates from a previous machine or secure storage
- Push TLS certs into place in the new machine
- Create a database and a username for the blog
- Fetch a SQL dump from the previous blog server
- Push a SQL dump to the new server and run it
- Fetch the blog media/uploads folder from the old server
- Push the media/uploads directory to the new server
- Rsync all the container start scripts into place
- On the remote server:
- Pull all the Docker images into place
- Tag the private images from their registry name (
registry.gitlab.com/username/imagename) to a local name
- Start all containers (these are basically
docker runcommands with various per-container settings:cd ~/docker./systems/netdata/host-start.sh./systems/smtp/host-start.sh./systems/docker-tidy/host-start.sh./systems/jonblog/host-start.sh./systems/traefik/host-start.sh
That list can be simplified even further, as I’ll explain later.
In order to test a service, I’ll usually add a fake entry in my local hosts file (e.g. for blog.jondh.me.uk), and once I’m confident it is stable, I’ll change the DNS records to point to new IP.
Configuring the CI
The configuration for CircleCI is in a simple YAML format. This is what I use:
# Build file for JonBlog

version: 2
jobs:
  build:
    working_directory: /app
    docker:
      - image: docker:17.05.0-ce-git
    steps:
      - checkout
      - setup_remote_docker
      - restore_cache:
          keys:
            - v1-{{ .Branch }}
          paths:
            - /caches/${CIRCLE_PROJECT_REPONAME}.tar
      - run:
          name: Load Docker image layer cache
          command: |
            set +o pipefail
            echo "Project name: ${CIRCLE_PROJECT_REPONAME}"
            docker load -i /caches/${CIRCLE_PROJECT_REPONAME}.tar | true
      - run:
          name: Sign into Docker registry
          command: |
            docker login -u username -p ${GITLAB_JONBLOG_REGISTRY_TOKEN} registry.gitlab.com
      - run:
          name: Build application Docker image
          command: |
            docker build --cache-from=${CIRCLE_PROJECT_REPONAME} --tag ${CIRCLE_PROJECT_REPONAME} .
            docker tag ${CIRCLE_PROJECT_REPONAME} registry.gitlab.com/username/${CIRCLE_PROJECT_REPONAME}
      - run:
          name: Save Docker image layer cache
          command: |
            mkdir -p /caches
            docker save -o /caches/${CIRCLE_PROJECT_REPONAME}.tar ${CIRCLE_PROJECT_REPONAME}
            ls -l /caches/
      - save_cache:
          key: v1-{{ .Branch }}
          paths:
            - /caches/${CIRCLE_PROJECT_REPONAME}.tar
      - run:
          name: Push Docker image
          command: |
            docker push registry.gitlab.com/username/${CIRCLE_PROJECT_REPONAME}
Stepping through it, this is what it does:
- Specifies that the build should run in a Docker container based on the prebuild image
docker:17.05.0-ce-git(so Docker is already installed) - Checkout the code in the associated BitBucket repository
- Use previously generated Docker image layers as a cache for new builds
- Sign into the GitLab image registry (using a secret generated manually in GitLab and stored in Circle env vars)
- Build the image and tag it for GitLab
- Update the cache based on the new image
- Push the image to GitLab
Of course, this can be customised depending on your specific needs. For example, you could push a success/fail announcement to a Slack channel, or run some tests that will prevent the image push if they fail.
In CircleCI, the build process will look like this when finished. The green icon in the top left indicates that the build was fine:

If you’ve not used CI software before, it’s fun to watch – it’ll render each section while you wait, and the process will only take a minute or so. Once you get used to it though, you’ll soon start letting it run in the background, and then check back when it’s done. Simple builds are done quickly, but more substantial builds (e.g. if they involve integration tests) can take much longer (sometimes several hours).
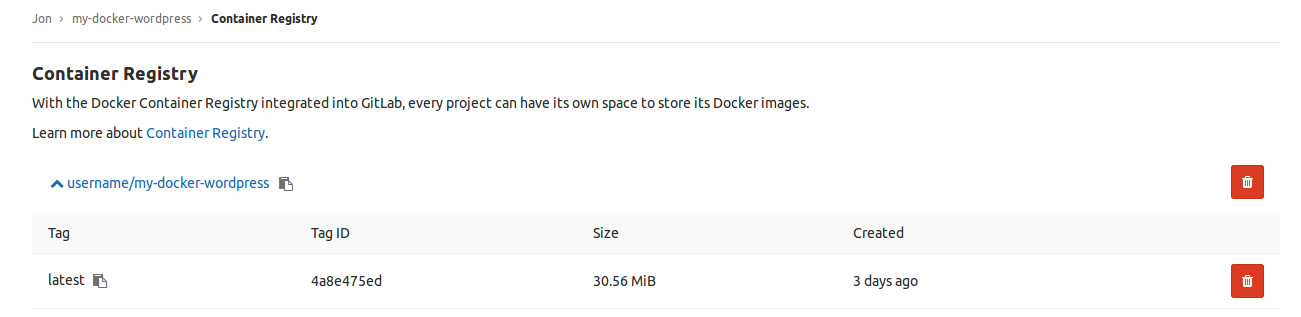
Once an image is pushed, it will usually appear in the web UI of your registry provider, so you can see its unique hash, and perform basic administrative functions on it:
Future improvements
I have several containers, and different improvements can be made for each. For the blog, the most interesting one will be to move from continuous integration (CI) to continuous deployment (CD). It would be a good idea to test that the Apache server comes up, so a misconfiguration can be stopped from reaching production. For readers who feel nervous about CD, an interesting halfway-house is to apply automatic deployment to staging environments, and require manual release for live. I believe CircleCI supports that, and I’d expect other hosted solutions would too.
As I mentioned on my prior post, I have no versioning strategy for my images. I’d like for images to be tagged in the build process, and pushed with their tags, so that an image history is built up in the registry. Then, if I deploy an image that fails in some fashion, I can easily work out what the previous image was, so I can retag and bounce the container within a few minutes.
MySQL can be moved into a container, while leaving the data in an on-server volume. This will remove the manual steps of setting a root password, and amending the listener to attach to all devices.
Finally, I see that my VPS provider has an API. Calling that in curl would mean that a clean machine could be provisioned from a repository script, employing secrets stored in CircleCI configuration. This would reduce the manual set-up steps still further.